
Our Cubelock deck guide for Rastakhan’s Rumble expansion will teach you how to play this popular archetype. This Cubelock guide includes Mulligans, Gameplay Strategy, Card Substitutions, and Combos/Synergies!
Introduction to Cubelock
Cube Warlock is a slow Warlock archetype first introduced in Kobolds & Catacombs. To be fair, the deck is very hard to classify – it has lots of Control elements (high cost cards, many removals), but very often you want to play it proactively. The deck also has some combos that you want to perform, and you could say that Carnivorous Cube combos bring it closer to a Combo build. In the end, the deck is somewhat of a mix between different archetypes, such as Midrange, Control and Combo, and that’s exactly what makes it so powerful.
Cube Warlock can adjust its play style depending on the matchup it faces. With lots of removal (especially AoE), healing and Voidlords, it stands a chance against most of the aggressive builds. And thanks to the Mountain Giants and Doomguards, it can put enough pressure on a slower deck.
Because the Standard rotation didn’t affect it much, Cubelock remained a strong deck throughout Year of the Raven. The only new card that’s an auto-include is Lord Godfrey, a very powerful late game AoE (much better than Twisting Nether against Aggro builds), but given that the deck kept most of its power, at first it has warped the entire meta around it. Sadly for CubeLock players, a nerf patch happened soon. Between increasing the mana cost of Possessed Lackey (from 5 to 6) and reducing the healing from Dark Pact (from 8 to 4), the deck lost a lot of momentum. Does it mean that it’s no longer viable? No, not at all! Even though it lost a lot of its power, at the same time other players stopped teching against it heavily, so in the end, the deck is still good.
While it’s not a very popular choice, and probably not a Tier 1 option, it’s a deck you can definitely climb the ladder with even in the current, Rastakhan’s Rumble meta.
Check out our Wild format Cubelock Deck Guide!
Rastakhan’s Rumble Cubelock Deck List
Check out alternative versions of this deck on our Cubelock archetype page!
Cubelock Mulligan Strategy & Guide
Against Aggro you want to have early board-clears and life-gain cards, and against Control you want essential combo pieces.
VS Everything
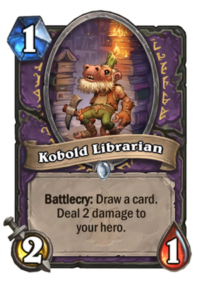
- Kobold Librarian – Cheap minions that draw cards have always been good, but this is one of the better ones. It activates Lesser Amethyst Spellstone, cycles through your deck, and provides you with a much needed 1-health minion for Defile that you don’t hate to put into your deck.
- Skull of the Man'ari – Pulling big Demons from your hand is your best way to win in the mid game against any kind of deck. The slight downside is that you might not draw any of your big Demons by Turn 5 (although it doesn’t happen often).
VS Fast Decks
Higher Priority (Keep every time)
- Defile – One of the strongest board-clearing tools in all of Hearthstone, Defile is amazing at getting you through the early game. Defile handily clears small minions, and is one of the only ways to do so while also removing Deathrattle-produced tokens.
- Doomsayer – The reason you play Doomsayer is that the card is amazing vs Aggro. When played on Turn 2, it usually pops and destroys the whole board. Not only you can clear some early game minions this way, but you also force your opponent to skip board development on his turn.
Lower Priority (Keep only if certain conditions are met)
- Lesser Amethyst Spellstone – This card is pretty bad at first, but even after just a single upgrade, it gets amazing. That’s why you keep it with Kobold Librarian, so you can guarantee a 5 damage + healing on the curve.
- Hellfire – While it might seem like a desperate keep, your ability to clear the board in the mid game is often what wins you the matches vs Aggro decks. Keep it against decks that like to flood the board a lot, such as Odd Paladin.
- Mountain Giant – Going second, with an AoE clear like Defile or Doomsayer already in your hand. It’s still a great Turn 4 play, but you have to Life Tap on Turn 2 and 3 if you go first if you want to play it. Going second, you can tap only once and drop one of your 2 mana plays on T2/T3 instead to set it up.
VS Slow Decks
Higher Priority (Keep every time)
- Mountain Giant – Against slow decks you can afford to spend your first few turns Life Tapping, which sets you up to play Mountain Giant on turn 4. Mountain Giants that early can often win you games, but it also soaks up opponents removal, making your later threats harder to respond to. Other than Skull, Mountain Giant is the best card to get in slower matchups, and that’s why you always want to mulligan for it.
Lower Priority (Keep only if certain conditions are met)
- Doomsayer – Keep when going second and the rest of your hand is okay. Even though it’s more of an anti-Aggro card, sometimes you can keep it vs slower decks too, in order to answer their early game plays and stall their board development. DO NOT keep it if you’re going first, because you will need Taps on Turn 2 and 3 to play Giant. Going second, you can Tap on Turn 2 and drop Doomsayer on Turn 3, setting up a Turn 4 Giant really well.
Cubelock Win Rates
Winrate stats are currently unavailable for this deck at the moment!
Cubelock Play Strategy
Vs Aggro
Games against Aggro aren’t different than with most of the other decks. Most important thing is to constantly clear the board and survive. In case of Cube Warlock, the key moment is usually surviving until you clear the board and drop Voidlord your opponent can’t answer (e.g. he has no Silence). It can sometimes happen as soon as turn 6-7, although the biggest swing with Cube Warlock happens on Turn 10 – thanks to the Bloodreaver Gul'dan. But, how can you survive that long when your opponent is constantly trying to push damage? 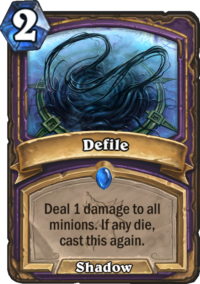
Most important part is AoE damage. Your deck runs two early/mid game AoE damage spells – Defile and Hellfire + a slightly different form of board clear, Doomsayer. All of those are really strong in different cases. Hellfire is just your generic 3 AoE damage – it’s enough to clear most of the early game minions your opponent will play. Defile is better when it comes to those tricky boards – if you can line up the health totals of minions, you can even clear 4-5 health minions, as well as everything up to that point. Doomsayer is easiest to counter, but also strongest in the early game, as your opponent will have to skip a turn if he can’t clear it. It’s also a good “proactive” stall tool – after you clear a board, you can drop Doomsayer to force your opponent to skip a turn. Very useful during later turns, when you have something you want to play next without being interrupted. Sometimes you can also drop two Doomsayers on a single turn – it increases the chance of them blowing up quite heavily. Yes, you use two cards instead of one, but it might be worth it if you need to stop your opponent from getting huge board.
On top of those, this build uses Lord Godfrey. Even though 7 mana cost seems quite expensive, it’s very useful, especially against those board flooding Paladins or Zoo Warlocks. Not only it should be able to clear the board quite easily (it’s almost impossible to play around it AND putting multiple minions on the board at the same time), but it also leaves a 4/4 body that you can get another trade with next turn.
One of the most important skill is picking the right AoE for the right situation. Generally, in the early game, try to rely mostly on the Doomsayer. Later in the game, it really depends on the deck you play against. If your opponent doesn’t really play 1 health minions, then you should take Defile value whenever you can. If he does – then you can be a little more greedy with it and wait for a good opportunity. Don’t use your AoE too lightly – Aggro decks usually have multiple ways to refill the board, so if you AoE down two small minions, you might not have a way to deal with their next board flood. 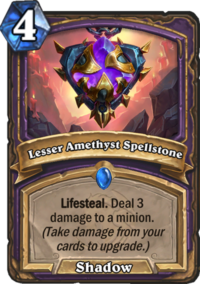
But, even with lots of AoE, your opponent will still deal damage (not to mention that you will also deal damage to yourself) – it’s just something you can’t help. For that reason, in order to keep yourself alive, you run quite a lot of healing. Sadly, the Dark Pact nerf reduced the total healing of your deck by 8, which is massive in Aggro matchups. Still, between 2x Dark Pact, 2x Lesser Amethyst Spellstone, Shroom Brewer and Zilliax, you can heal for quite nice amount, not to mention that Bloodreaver Gul'dan is usually a game over for your opponent, not only because you resummon Demons, but also because you heal for 3 more per turn.
Preserving your life total is important, but don’t mistake not taking damage at all with preserving health. Kobold Librarian is still one of the best cards vs Aggro, even if you take 2 damage. If it trades into your opponent’s 2/1 (for example), then you indeed took 2 damage, but you saved probably 4 or 6 in the long run. Life Taps are similar – even though taking damage and doing nothing is terrible against Aggro, tapping brings you closer to your big Demons (and ways to summon them), as well as AoE and healing cards. You should still Hero Power in the early game, and in the mid/late game if you have free mana and still lots of health. Safe health really depends on the matchup and situation – e.g. aggressive Paladins don’t have a lot of ways to deal damage without board, but Tempo Mage can kill you from 20+ health over 2 turns, with no minions at all. 
Voidlord is a key card when it comes to surviving. But one is often not enough – not only it can get Silenced, but opponents sometimes have ways to get through it (e.g. Sunkeeper Tarim). That’s why cards like Faceless Manipulator and Carnivorous Cube + Dark Pact are so great – you can extra copies of it, so now even if your opponent Silences or deals with one, he still has another to go through. One play that you might consider if Voidlord is the only thing that stands between your opponent’s minions and lethal is using Dark Pact on your own Voidlord. This way you play around Silence. Let’s say that you’re at 10 health and your opponent has 12 damage on the board. If he Silences Voidlord, you’re dead. But if you Dark Pact it, you go up to 14 and put 3x 1/3 Taunt on the way, so even if he Silences one, that’s still 20 effective health, which means that you will survive. Of course, it’s a quite desperate play – you should do it only if you’re stalling for time, e.g. you’re right before your board clear turn (Lord Godfrey) or before Gul’dan turn.
If you get to Turn 10, a big Bloodreaver Gul'dan is usually game over, assuming that you can revive at least one Voidlord (+probably a bunch of Voidwalkers and possibly some Doomguards). If you have Gul’dan in your hand already and you’re just a few turns off, try to not make any risky plays. Just clear the board constantly and heal up as much as you can. Turn 10 swing is going to win you the game almost every time, so there’s no reason to risk it. If your opponent somehow answered your board (e.g. Even Paladin running Equality combos – not really an Aggro deck, but you get what I mean), then try to Hero Power every turn and continue with your previous game plan of clearing the board. Now with a better Hero Power, there is no way that a faster deck will outvalue you.
Vs Control
When playing vs slower decks, just surviving is not enough. Cube Warlock is not a high value deck. You don’t run multiple tools that generate extra resources, or ways to win a slow, fatigue-oriented game. In the long run, lots of decks are going to destroy every threat in your deck (e.g. Odd Warrior), destroy your deck (Rin, the First Disciple or just kill you through some combo (e.g. Malygos decks, Mecha'thun decks etc.). Of course, it all depends on the match, but you usually have to just kill them before you run out of resources. 
First and one of the most important cards in those matchups is Mountain Giant. I’d say that around 1/4 of the games with Cube Warlock are won around Turn 6-7 thanks to the Giants. Dropping a Giant on Turn 4 is really big when your opponent can’t answer it right away, mostly because you can do so many things later while still putting pressure. Your opponent has to play defensively, while you can push. Most of the time, unless there is some high priority target on the board, you just push face damage. 8 per turn is a lot and can’t be underestimated, especially against Warlocks (which should already be around 20-24 health from the taps and Librarians). After dropping the Giant, you have a few things to do. You can play another Giant, copy the one you have with Faceless Manipulator, play Skull of the Man'ari. On Turn 6 you can either drop Possessed Lackey (good thing is that if you have something on the board already, your opponent might be too busy to worry about silencing it). You can also eat your Giant with Cube and Dark Pact it. The last play is especially powerful if you need to attack something and lose health in process. For example, your opponent drops a 5/5 minions. Hitting it, then dropping Cube and killing it results not only in healing your Giant up, but also getting an extra one. However, if you play a matchup in which putting pressure is important, you’d want to do that even on a full health Giant just to get an extra 8/8.
However, that aggressive push won’t always work. Your opponent might have an answer, or put a Taunt wall. If that’s the case, take the game a bit slower, especially with a very reactive hand. There is no harm in just clearing the board and waiting until Turn 10 swing or Cube combos to close out the game. 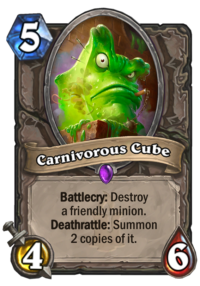
Talking about Cube combos – in slow matchups, it’s usually better to copy Doomguards than Voidlords. While Voidlords provide a huge wall, not only they aren’t aggressive enough, but Voidwalkers also dilute the Bloodreaver Gul'dan spawn pool. It’s a big issue a lot of players don’t think about – reviving 3-4 Doomguards is usually game-winning, while reviving 6 Voidwalkers and Voidlord is… not bad, but underwhelming. So it’s generally better to save the Cube combos for Doomguards. The best way to set those up is Skull of the Man'ari. Once it summons Doomguard, you go face (or bump it into something, you can even get the first one down to 1 health as long as it doesn’t die), then Cube + Dark Pact it, and then get another 10 damage. That’s already up to 15 damage, with two 5/7’s on the board your opponent has to clear. Even better if you have Spiritsinger Umbra. Then after Doomguard is dropped on the board, you can play Umbra + Cube + Dark Pact, increasing the total damage to 25 – usually enough to kill any opponent unless he has stacked a lot of Armor or put a wall of Taunts up. Then, if you go into your Gul’dan turn, you will most likely re-summon more Doomguards, often closing out the game as soon as Turn 10 if you didn’t manage to do it earlier. 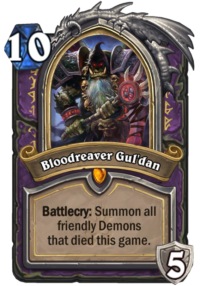
Since the deck runs no Siphon Soul or Twisting Nether, your reactive game vs slow decks is much weaker. You can still kill a single minion with upgraded Spellstone, but once your opponent puts two or more big threats, you might have a very hard time. That’s the problem you solve by simply putting pressure all the time. If you have minions on the board and your opponent is pretty low, he has to remove them / Taunt up / heal up all the time, leaving no room to develop. However, this strategy takes a huge toll on your value. If you constantly push, your opponent usually gets the better trades, removes your minions efficiently etc. and you often end up getting outvalued. It doesn’t matter as long as you can kill your opponent first, though.
Talking about the Hero Power, once you transform into DK, that Hero Power is often one of your main win conditions. Simply using it on your opponent every turn can put a lot of pressure on their health – like a better Hunter’s Hero Power. It’s best when you face a Warlock who hasn’t transformed yet. Generally, try to use it every single turn – in the best case scenario you “suck” their Hero, while deal with the board with removals like Hellfire, Spellstone etc. However, if you have a board yourself and clearing something will protect your board, it’s often worth to clear with the Hero Power too. It all depends on the context, how much burst you have, how much health your opponent’s at, board states etc.
Card Interactions
- Faceless Manipulator and Prince Taldaram summon the targets of Carnivorous Cube when they die if they copied it. If they copy a Doomguard, Bloodreaver Gul'dan is that much more likely to summon additional Doomguards when played. Also keep in mind that while targeting Carnivorous Cube is their intended purpose, they can also target opposing minions such as The Lich King.
- Carnivorous Cube and Possessed Lackey can be used to punish your opponent for playing Doomsayer – he .
- Skull of the Man'ari and Doomsayer have an interesting interaction a lot of people don’t think about. Start of turn effects are resolved in the order they were played in. So if you play Doomsayer first and THEN Skull, even if you have a Demon in your hand, Doomsayer will proc first and only then your skull will summon a Demon. However, the other way around is more common. If you have Skull already equipped and a Demon in your hand, it would often be foolish to play Doomsayer, as that Demon will immediately die.
- Another interesting Skull of Man’ari interaction is that it pulls out a Demon BEFORE you draw a card. So, as long as you have a Demon in your hand and you don’t suspect that your opponent will destroy the weapon, it is possible to finish turn with 10 cards in your hand and not overdraw. Whether it’s worth it or not really depends on the situation, but sometimes you really don’t want to play any card and it’s better to take a slight risk of him destroying the weapon than to let’s say play Hellfire vs no minions.
Cubelock Card Substitutions
Although Despicable Dreadlord and Vulgar Homunculus are excellent cards that otherwise have good synergy with the deck, you can’t include them because they derail your consistency with Possessed Lackey, Skull of the Man'ari and most importantly Bloodreaver Gul'dan. You really want Gul’dan to summon as many Doomguards as possible to end the game. 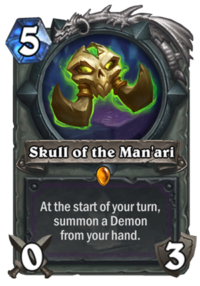
Skull of the Man'ari, Carnivorous Cube, Voidlord, Mountain Giant and Bloodreaver Gul'dan are absolutely irreplaceable. Other cards, however, including Doomsayer, Spiritsinger Umbra or Zilliax can indeed be replaced. Here are some of the cards you can consider using instead:
- Siphon Soul and Twisting Nether – These cards are often run in Cube-based Warlock decks, and there’s nothing wrong with them. They are absent from this list to make room for more threats, but if you’re missing some of the threats, you can add them instead.
- Stonehill Defender – It’s a solid card in the deck, but you can only play it if you also remove Prince Taldaram.
- 2nd Faceless Manipulator – Again, if you’re missing one of your Epics/Legendaries, you can try out another Faceless manipulator. It’s a flexible card that fits into Cube Warlock really well – you can put more pressure by copying a Giant or Doomguard vs Control decks, or you can put another huge Taunt by copying Voidlord vs Aggro.
- Bloodmage Thalnos or Tainted Zealot or Kobold Geomancer – Spell Damage combos well with Defile, so slower Warlock often include it. Defile is a strong enough card on its own, so it’s not necessary to run any Spell Damage, but if you’re looking for spots to fill this is a good place to look. Each of the cards above have their individual strengths. Thalnos draws a card when he dies, Zealot adds Spell Damage to an additional Defile tick, and Geomancer is guaranteed to be in your collection!
- Acidic Swamp Ooze or Gluttonous Ooze – Weapon destruction isn’t a bad tech in the current meta. Gluttonous can only be played if you don’t run Taldaram, but you can always put the regular Ooze in.
- Plated Beetle – It’s another good early game card, especially useful as a replacement for Doomsayer, since both are good vs Aggro.
- Spellbreaker – It’s mostly a meta call, but there was no meta in which Silence was completely useless in a long time. Can come handy against Exodia and Even Paladins (silencing buffs), Even Shaman (getting rid of Flametongue Totem), Odd Quest Warrior (getting through a big Taunt) etc.
Leave a Reply
You must be logged in to post a comment.
Replacement for Spiritsinger umbra ??
umbra is good but not needed. just add another faceless or shroom brewer
Nice concept, however, why the Shroom Brewer. I notice other builds use dual Face Manipulator. Got to rank 5 easy with the build. Its a great deck, ever since it came out. ^^
For healing, obviously. It’s a safer approach. 2x Faceless can work, but it’s a bit more greedy – much less useful vs Aggro and doesn’t really work unless you actually already have something to copy.
Faceless is better in slower matchups, where Cubing a big minion + Facelessing the Cube can be a game-winning play.
Good Job, SIR!