Tombs of Terror is the solo PvE adventure content for the Saviors of Uldum expansion. It picks up on the story from last expansion’s The Dalaran Heist. After League of E.V.I.L. has stolen the Dalaran city, they headed towards Uldum and unleashed plagues (which took the form of powerful Plague Lords). But completing their plan might not be as easy as they thought, because this time the League of Explorers is there to stop them. You will play as one of them, trying to stop plagues from spreading across the world.
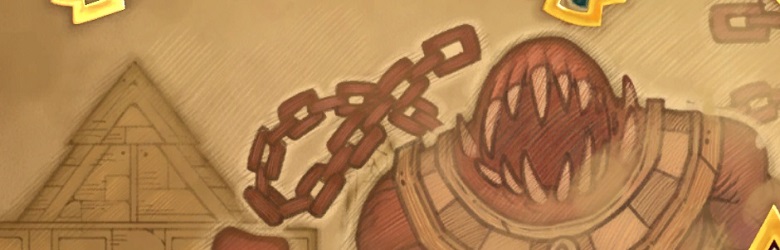
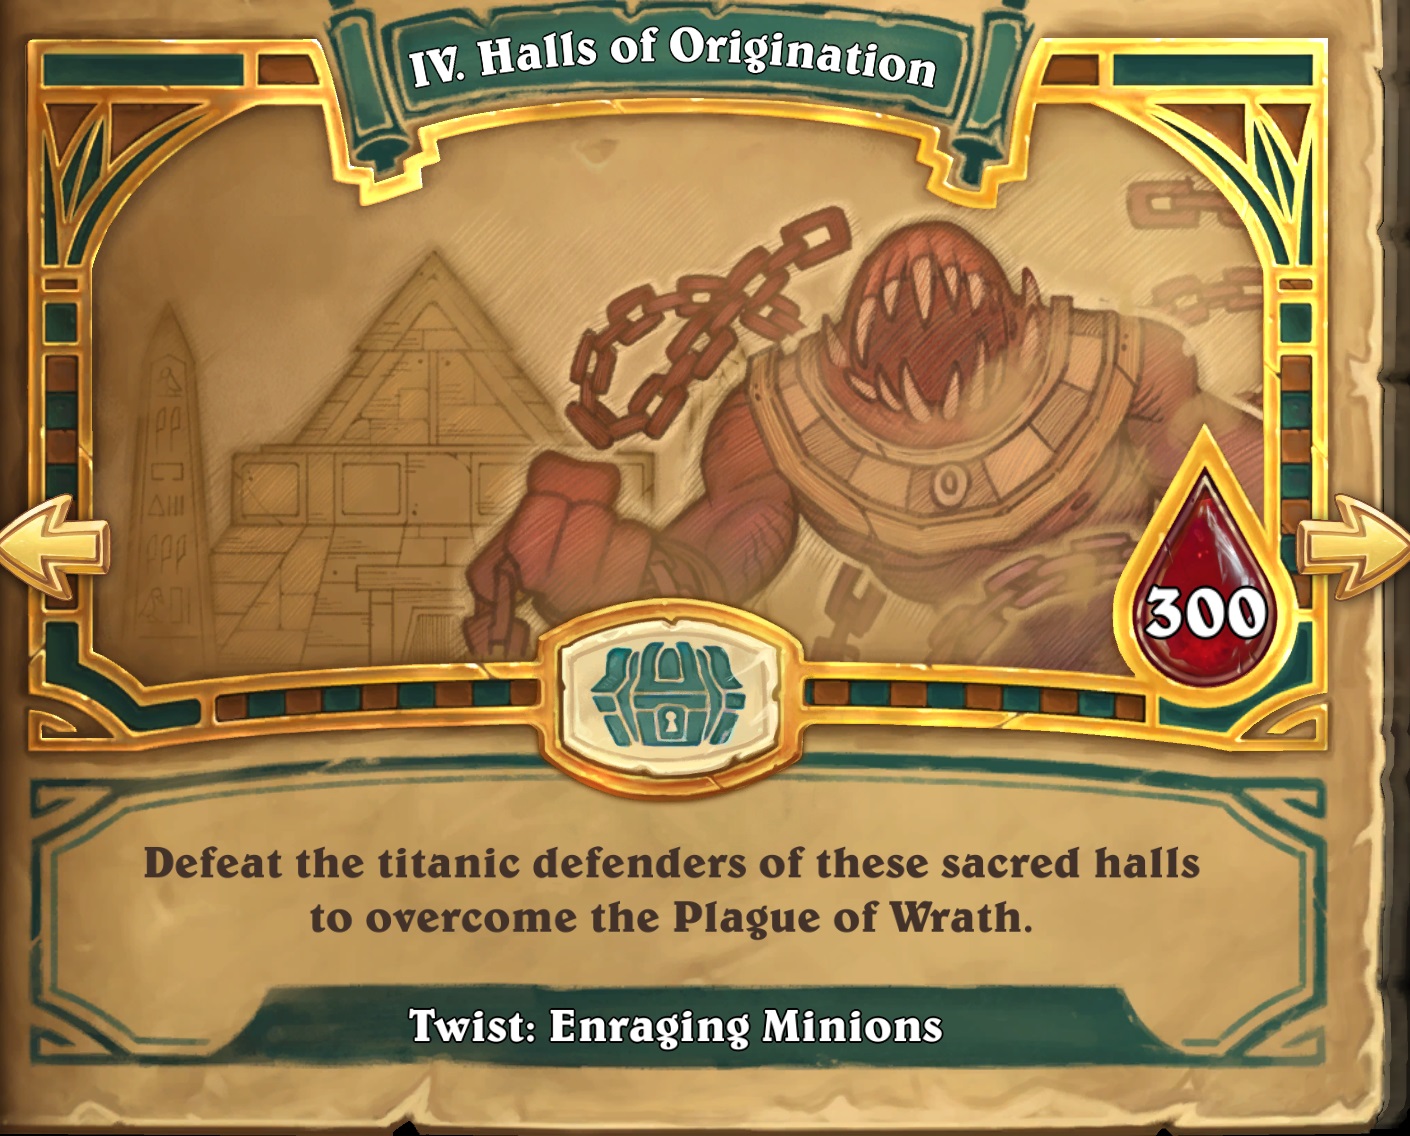
In the fourth chapter, players will visit the Halls of Origination and fight against Plague Lord of Wrath – Icarax.
Check Out Our Other Guides!
- Tombs of Terror General Guide
- Chapter 1 Guide – Vesh, Plague Lord of Murlocs
- Chapter 2 Guide – K’zrath, Plague Lord of Madness
- Chapter 3 Guide – Xatma, Plague Lord of Death
- Chapter 5 (Finale) Guide – Tekahn, Plague Lord of Flames
- Reno Jackson Hero Guide – Mage / Rogue
- Sir Finley Hero Guide – Paladin / Shaman
- Elise Starseeker Hero Guide – Druid / Priest
- Brann Bronzebeard Hero Guide – Hunter / Warrior
Twist: Enraging Minions
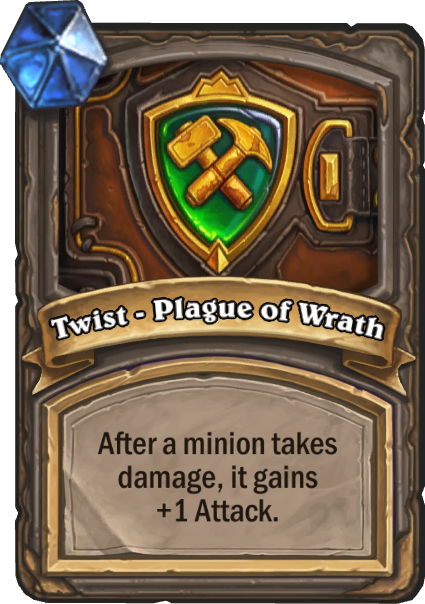
Enrage keyword might have been abandoned, but similar mechanics haven’t. And it will be present throughout an entire chapter! Every time a minion takes damage, it gains +1 Attack. The first card that might come to mind is Frothing Berserker, although the effect is a bit different. In case of Frothing, ANY minion taking damage gives him +1 Attack. In case of this Twist, only the minion that takes damage will gain extra attack. Which makes the effect Ymore similar to Gurubashi Berserker – but less powerful, of course.
Unlike the oldschool Enrage keyword, though, it’s not an on/off switch – the effect is not either active or not. It’s permanent and isn’t tied to the minion’s max health – if you heal the damaged minion back to full, it won’t lose its buff.
The twist won’t always trigger, though. Any sort of immunity will prevent it from triggering, since minion did not take damage. Same goes for Divine Shields – when the Shield is popped, minion doesn’t take damage, so it gains no extra Attack. Of course, the other minion will still get extra Attack (unless it dies).
Chapter 4 Strategy
A permanent effect that increases Attack of minions when damaged has huge implications, both on the deck building and the way you play the game. Let’s start with the former.
First and most obviously – any cards that benefit from being damaged get extra value, since they can “double dip” and you will be building the deck towards self-damage synergies anyway. Cards like Armorsmith, Acolyte of Pain or Axe Flinger will work amazingly well throughout this chapter.
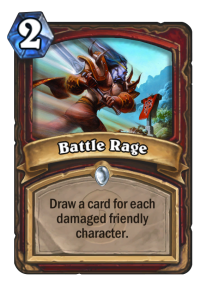
Then, to synergize with those as well as the Twist, self-damage cards can be very strong. Any kind of Whirlwind effect (Whirlwind, Warpath, Ravaging Ghoul) will get a lot of extra value in this chapter – while they will also buff your opponent’s minions, they will still be more beneficial to you since you can control the timing. Then, picking damaged minion synergies is a great way to approach this chapter – e.g. Bloodsworn Mercenary, Battle Rage or Crush get much stronger in this chapter, since you will have more incentives to damage your own minions. This makes Brann (Hunter / Warrior dual class) a perfect choice for this chapter, given that they have a few buckets that would benefit heavily from the Twist.
Another thing you want to keep in mind when deck building is the Attack / Health distribution. Normally minions with very high Health but low attack are bad, because they can’t trade well – they can take a few hits, but they won’t kill anything. This Twist changes things considerably. Given that a high health minion can take more hits before dying, it will on average trigger the Twist more times. Of course, it might still not be worth it to go into extremes, but try to pick minions with stat-lines leaning towards Health, such as 2/4, 3/6 or 4/7.
In a similar vein, keeping the minion alive for longer can yield some great results, because he longer it stays on the board, the more it will snowball. That’s why buffs, especially health buffs, also get extra value. Healing cards (and Hero Powers) also work well, but only on a higher health minions (because lower health will often die before you get a chance to heal them back). This part (and the last one to a certain extent) makes Elise (Druid / Priest dual class) also a solid pick in this chapter. If you pick a bunch of higher health minions and then keep them alive with buffs / healing / etc. you can gain a lot of extra value. After just a few hits they will turn from being just sticky to being sticky big threats. Heal cards will also get extra value against the Plague Lord, which can destroy damaged minions with one of his Hero Powers – if you can keep your most important minion at full health, it will be more difficult for him to do so.
When it comes to the game play – board control will be very important throughout this chapter. If you let your opponent do the trades, not only he might pick some better ones, but his minions will also get stronger. If you’re the one doing trades, you can both get the board control and buff your side of the board – so in general it’s not worth ignoring everything and going face for the most part.
Attacking order will be incredibly important. Ideally, you will want to kill opponent’s minions in a single hit – this way they won’t get any extra attack. If you can’t, however, try to attack with the minions that would survive the trade first and then with the one that would die. Let’s say that you face a 2/5 and you have a 2/2 and 3/3 on the board. Normally attacking order wouldn’t matter at all, but in this chapter if you hit with a 2/2 first, the 3/3 will die too. But if you do it the other way around, 3/3 would survive and gain extra attack. In this simple example, you end up with nothing if you do it incorrectly and a 4/1 if you do it correctly – a big difference.
Icarax, Plague Lord of Wrath Guide
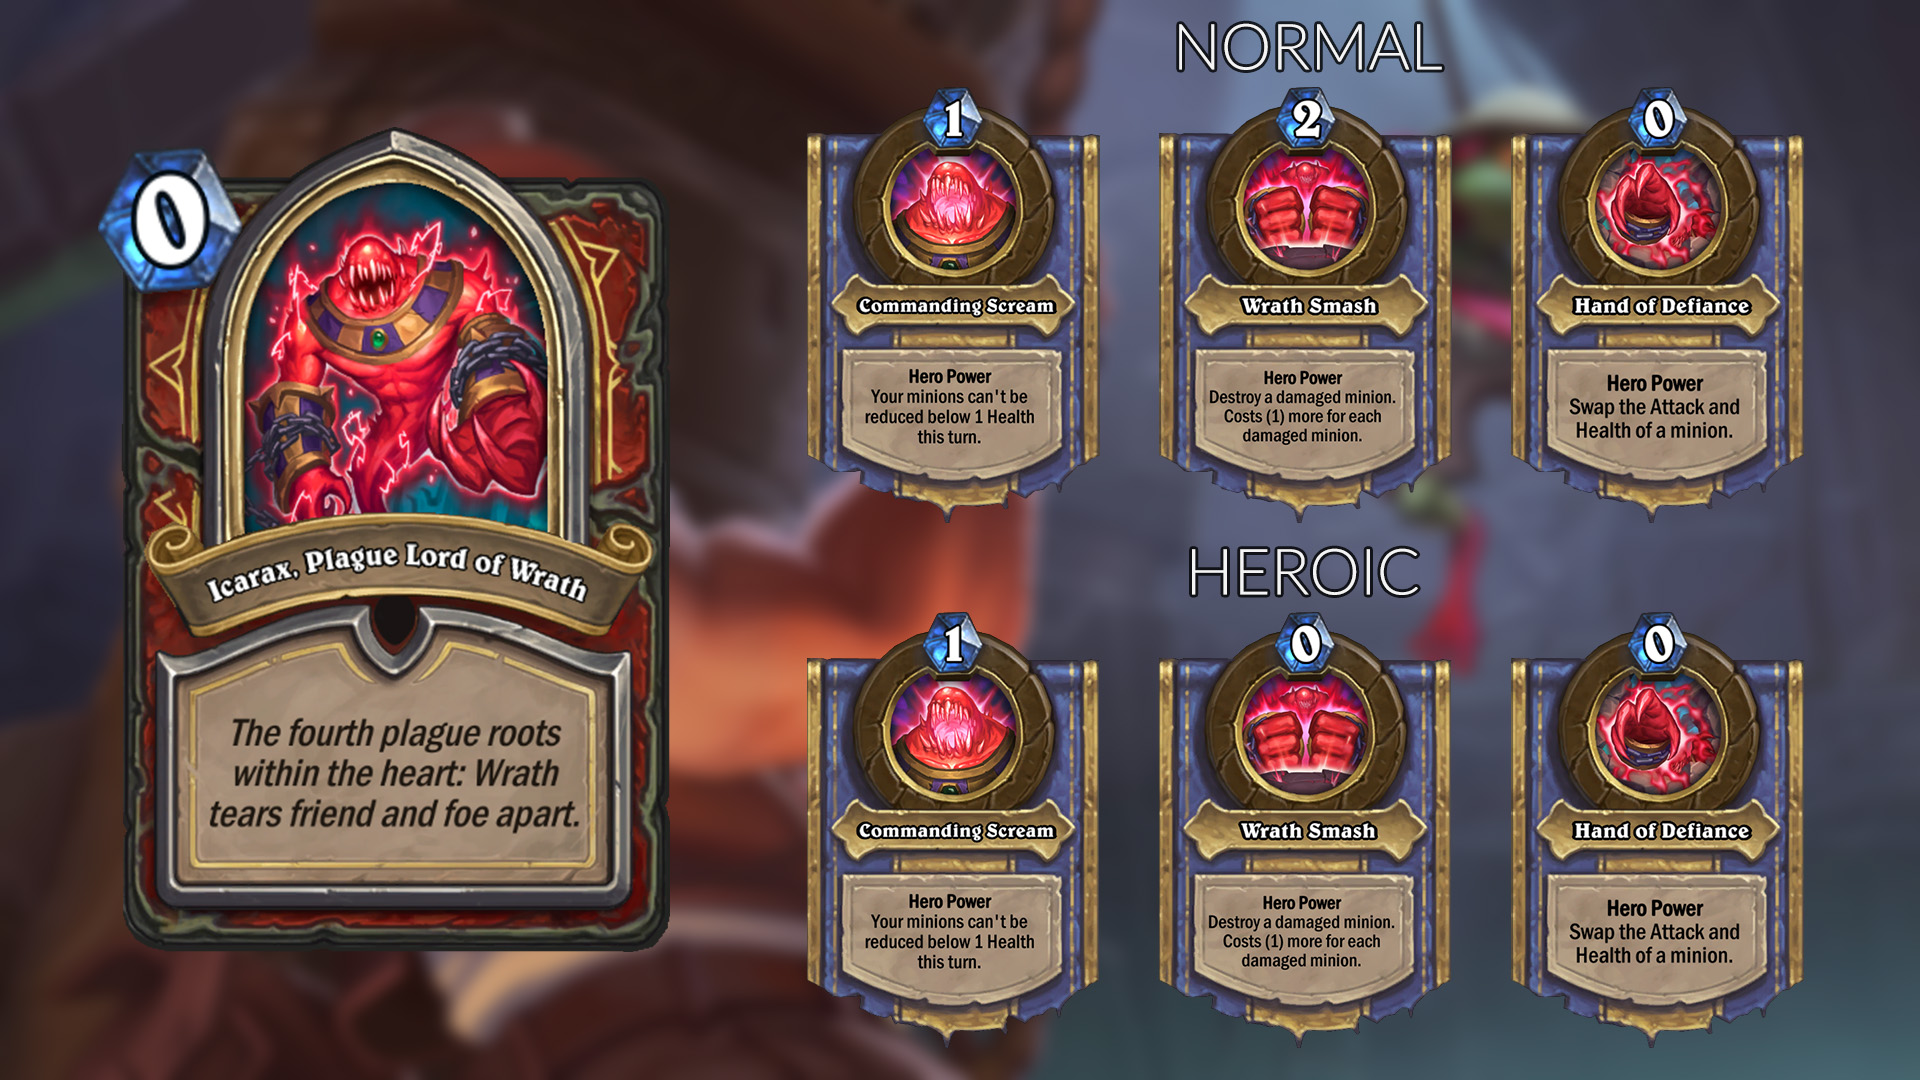
Phase 1 – Commanding Scream
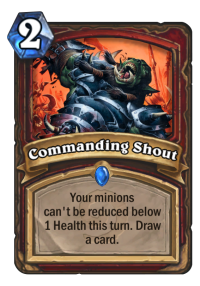
In this phase, Hero Power is the same both on Normal and Heroic. It works exactly like Commanding Shout (except the card drawing part). After he uses it, his minions can get down to 1 health – once they get to 1 health, they no longer take any damage. Which means that any trades, any kind of mirrored AoE damage etc. won’t kill them. It’s also worth noting that the effect is not full immunity – DESTROY effects will still work – so if he decides to cast Plague of Wrath, his minion will still die despite the Hero Power. Secrets like Vaporize or Pressure Plate that instantly kill and not damage will also work.
You general strategy is simple – try to kill all minions Icarax plays. The only exception is when you have no board yourself – e.g. if you’re setting up a big AoE turn. Any minion left alive will be able to attack one of yours for “free” – this Hero Power provides some amazing trades. The only situation in which you might ignore his board is when he plays something big that would get free trades into your minions anyway. E.g. when he plays a 5/5 and the biggest minion you have has 4 attack – then he wouldn’t die anyway, making that Hero Power useless. Of course, if possible, you still want to kill it, so he won’t get any other damaged minion synergies, or in case he would want to play some AoE spell that hits his own minions too.
That said, you won’t be able to stop everything. Icarax can still play Charge / Rush minions and activate Hero Power on the same turn, getting value out of it. The best case scenario for him is definitely Batterhead when you have a small minion to start off the chain. He will gain extra Attack with every hit, eventually being able to kill your big minions too. Another scary combo is Akali, the Rhino into Batterhead – that will nearly sure clear your entire board with the first Hero Power.
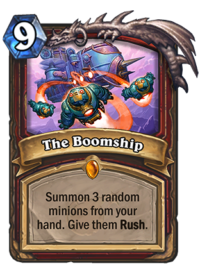
In general, Icarax runs some sort of a Rush / Tempo / Big Warrior mix. He plays a bunch of small / medium Rush minions, damage synergies like Frothing Berserker, but also a bunch of bigger stuff. He plays Woecleaver too, which – if the RNG is on his side (and I’m not sure if it’s not fixed, as he always got big minions against me) – can Recruit some really scary stuff. Having weapon removal available would be perfect. Other way to summon big minions out of his hand is The Boomship – which can be particularly powerful in the combination with this first Hero Power, as he will sweep a big part of your board and leave a bunch of 1 health minions on his side. That’s the reason why having some small AoE can be really benefical in this phase. Even a silly Whirlwind would often be able to clear 3-4 high attack minions.
I’ll cover that part here, since he uses the same AoEs throughout all phases. He runs Warpath, Brawl and Plague of Wrath, so keep that in mind. The worst thing is that it’s impossible to play around all of them at the same time – they’re good against both big and small minions. You can’t really overextend, but you also can’t play too little, because then he will run over you with minions with you having no ways to trade. You need to maintain the right balance, especially around phase changes, when he always draws his AoE. The best approach is to have 3-4 minions out at the same time and some refill in hand all the time – if he AoEs you, you just play more. Since his Hero Powers don’t really put you on a clock, if you have a high value deck, as long as you stabilize you should be able to outvalue him in the long run.
Phase 2 – Wrath Smash
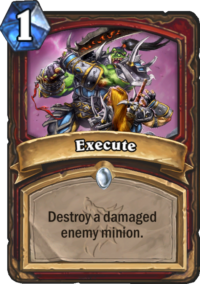
In this phase, Hero Power is different in Normal and Heroic. Normal one costs 2 mana + however many damaged minions there are on the board. Let’s say that with 3 damaged minions, it costs 5 mana – making it a quite expensive Execute, much more difficult to use – the boss will often have to skip or at least won’t develop much when playing it. However, the Heroic one means that he has 2 more mana to work with every turn assuming he uses the Hero Power, making it a much stronger tempo tool.
No matter whether you play it on Normal on Heroic, though, your game plan is similar. Try to not damage your biggest / most important minions and don’t let your oponent get a “cheap” damage in. For example, don’t leave a small minion on his side that he can run into your minion and then play Hero Power. If you don’t have to, don’t trade with your biggest minions or possibly heal it back up after trading. Another way to approach this is to not play any big minions at all and focus on flooding the board with small / mid-sized minions. This way even if he kills some of them, it’s not a big deal. This strategy can still be punished by Batterhead. Even though he no longer has the first Hero Power, at 12 Health he should still be able to clear a solid part of your board.
In theory, one way to play around this Hero Power would be to keep all of your minions damaged, but that plays too much into Plague of Wrath, so I don’t recommend it. Even if you have 5 damaged minions on Heroic, he would still be able to pick the biggest one. So during majority of your turns, you just have to accept the fact that one of your minions will die to the Hero Power. Ideally you want to get through this phase as quickly as possible, since the Hero Power generates a lot of extra card advantage for Icarax.
Phase 3 – Hand of Defiance
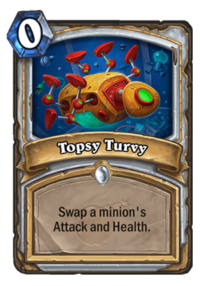
In this phase, Hero Power is again the same both on Normal and Heroic. It works exactly the same as Topsy Turvy and even costs the same. What’s important to note mechanically is that once attack and health is swapped, all the “damage” is erased. E.g. if a 5/5 minion has taken 1 damage, it’s now a damaged 5/4 minion. But after this Hero Power, it will be an undamaged 4/5 minion. It’s important for the sake of synergies (if he Turvies you damaged minion you can no longer e.g. draw an extra card from it with Battle Rage), and it also plays around Plague of Wrath.
To be honest, it seems to be the easiest phase of them all. From my experience, the Hero Power doesn’t do a lot. Sometimes it can help him with trades (e.g. when you have a 3/7 minion on the board, he can turn it into a 7/3 and then run something small into it), sometimes it saves one of his minions from Plague of Wrath, sometimes it makes his minion slightly stronger… but compared to the previous two, and to most of the other Plague Lord Hero Powers it’s not that impactful.
Just continue with your game plan of playing around AoEs, clearing his board so he won’t get extra value from Twist and damage synergies, and damaging him whenever you can.
I had a weird cheesey way to win – I played with the anomaly that forces players to remove all minions before hitting face, I picked up rexxar and searched for zombeasts with stealth. The boss’s board clears are all double sided, so when he finally managed to kill my minion, he killed his own big board and I won easily
…that would be like an auto-win with Stealth passive too 😀 He can never attack you.
Beat him on the first try using Brann. I got the treasure that makes your big minions cost 5, and the one that doubles all your legendary minions. I picked up every “legends” bucked I got offered, which was a lot. On the final fight, I dropped a double Emeriss on turn 5 and a double 16/16 King Krush on turn 6.
Super fun run. I’m really enjoying Tombs of Terror in general.
That’s exactly how I beat him too! I had a few King Krushes and Emerisses with Scepter of Summoning, and while I didn’t manage to draw perfectly (in the best case scenario could get them to 64/64), I had like two 32/32 Krushes that just wrecked the boss 😀 I also had a huge Gahz’rilla just in case, but I didn’t even need it.
Going Big seems to be a solid strategy for Bran in general, since the class has access to a lot of powerful big minions and there are a lot of treasures that can make it work (Alchemist Stone, Crook and Flail, Scepter of Summoning).
Hi, there is a slight error in this phrase at the beiginning of the guide:
“In the fourth chapter, players will visit the Khartut’s Tomb and fight against Plague Lord of Wrath – Icarax.”
its “Halls of Origination” not “Khartut’s Tomb”.
Other than that, great guide as always, thanks a lot!
Thank you, fixed it 🙂