


/rating_1_half.png)
/rating_2_off.png)
Control
Warrior
Guide
Warrior
This guide will walk you through mulligans, substitutions, combos and the overall gameplan of this deck for the Knights of the Frozen Throne Meta.
1) Synopsis
Control Warrior is a powerful late game deck that focuses on dealing with early minions through dozens of removals and lots of armor, then aggressively taking control of the board in the late game with high-value minions until the opponent has run out of resources during which he’ll win the game with one of his many win conditions. His sibling, Taunt Warrior, had reigned surpeme during the Un’Goro meta where regular Control Warrior was too slow to deal with the very aggressive format. With Knights of the Frozen Throne, however, the meta has shifted back to a more control-oriented set of decks giving Control Warrior the space he needs to thrive again.
2) Strategy & Card Roles
Early Game
As explained in the Synopsis, you’re looking to deal with early game presence through your many, many removals while also armoring up. The more you armor up, the more damage your Shield Slam will inflict. Both it and Fiery War Axe are very cheap ways to deal with early minions while also focusing on furthering
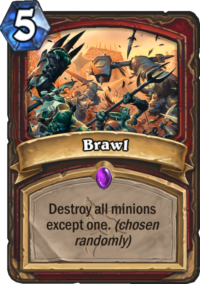
your game plan without wasting too much mana.Execute is your go-to removal for large minions you can’t kill, so it’s often safer to hold on to it until the late game when your opponent plays a very threatening target like The Lich King. Brawl is your best AoE that punishes swarm tactics, which your deck is especially vulnerable to. Sleep with the Fishes is also a strong, cheap AoE that will deal damage in conjunction with other damage-dealing effects. Lastly, Blood Razor can and will work as a weaker AoE to deal with swarm tactics but you should be careful: its value as an activator for damage-activating effects such as Rotface is of much higher importance, so you should only use it if you’re desperate or in conjuction to these effects.
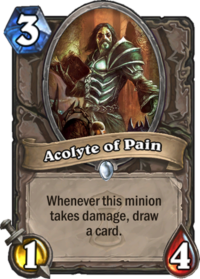
Such effects include Acolyte of Pain, which will allow you to draw more cards and not run out of steam, and Armorsmith, which will build up your armor for the late game. This is especially important, but I’ll go in more depth during the Win-Conditions section of this article. You can also activate these cards with Ravaging Ghoul, which also works as a small AoE if needed. Shield Block will provide you with survivability, and a Shield Slam boost, while also digging through your deck for resources. Lastly, Mountainfire Armor is a special early minion that serves a variety of purposes depending on how your opponent will deal with him: If your opponent chooses to deal with him through an early removal (which will prove problematic for Priest, since he is a 4 Attack minion), you’ll be getting 6 Armor and there will be one less removal for you to worry about. If he chooses to ignore him to avoid granting you 6 armor, which happens more often than you might think, you can use him to either deal pressure to your opponent by either going face or trade. Plus, once you play your N'Zoth, The Corruptor, these guys will come back and probably provide you with a lot of armor. There’s also Acidic Swamp Ooze for Weapon removal.
Mid-to-Late Game

Then comes the mid to late game, where you’re looking to pressure your opponent to waste their resources while you aggressively cheap away on his Health while also preventing him from building a board. Elise the Trailblazer is a big body that will provide you with a set of five, random Journey to Un’Goro cards. While seemingly random, these cards will prove essential once you start running out of resources and will hopefully stall for time until you draw your win-condition. Direhorn Hatchling is a big Taunt that more often than not will force your opponent to either trade with two minions or waste a removal on it. Besides that, it also comes back when you play N'Zoth, The Corruptor and shuffles a powerful Direhorn Matriarch into your deck. Be careful though, you don’t want to fill your deck with these Taunts before you draw your win-conditions or you might find yourself drawing that dinosaur when you desperately need to draw something else. Cairne Bloodhoof is your strongest Deathrattle and a special minion, since when used in conjunction with Brawl will not leave you defenseless.
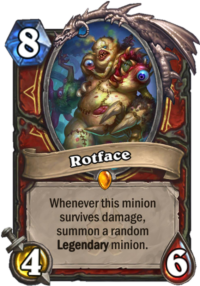
Then there’s Rotface. The new Knights of the Frozen Throne Legendary proves to be an immediate threat, so you should make sure to get value out of him the minute he steps in the board with cards like Blood Razor and the new Death Knight Scourgelord Garrosh, or at least through a very weak Shield Slam. If he survives damage, he will grant you a Legendary minion from the Standard Set. If you’re lucky, you’ll get minions like The Lich King, Ysera or Al'Akir the Windlord which you can draw value from immediately. Worst case scenario, you force your opponent to use their best removals on them and you don’t have to worry about them later.
Win-Conditions
If all has gone smoothly you’ve found yourself with the cards you need to activate your win-conditions. Now this deck has a lot of situations where it can push for lethal, so I’ll include the three most prominent:
1) N’Zoth, the Corruptor
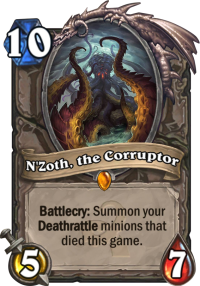
N’Zoth has been a staple to many Control Decks since its release in WotOG. His ability to bring back all Deathrattles makes him more often than not a two turn lethal if he is not dealt with immediately. In this deck, he is capable of bringing back Direhorn Hatchling, Mountainfire Armor and Cairne Bloodhoof. Obviously, your opponent will attempt to deal with him through massive AoE. This will result in +12 Armor, a 4/5 Baine Bloodhoof and 2x Direhorn Matriarchs shuffled into your deck. While not ideal, it’s still not a total loss. Try to duplicate N’Zoth with Dead Man's Hand for a second try. I doubt your opponent will be able to deal with a second N’Zoth.
2) Grommash Hellscream
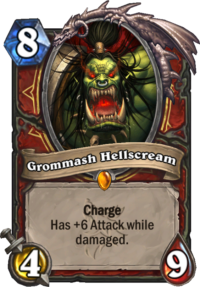
Grommash is an 8-mana legendary minion with Charge and the potential to deal 10 damage to your opponent. Considering the total Health a hero, other than Warrior, Malfurion and Quest Priest, can have is 30…you can see how he can become a problem to your opponent. The threat only increases if you succeed in duplicating him with Dead Man's Hand for a possible total of 20 damage. Use him in conjunction with Scourgelord Garrosh or Blood Razor and be very careful against Priest: They always carry a Mind Control.
3) Fatigue
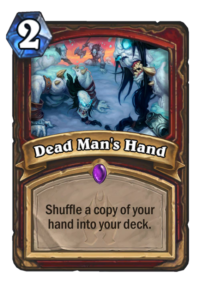
Warrior has the ability to exceed the 30 health limit all classes have, allowing him to easily climb to 50 and 60 total in Health. This gives him an edge in Control matches where, after the deck runs out, Fatigue kicks in. With the right cards Warrior can survive Fatigue far easier than any other class, effectively creating a ticking bomb for your opponent. Dead Man's Hand also assissts in this tactic by filling your deck with more cards, prolonging the Fatigue proccess. Very often you’ll find yourself focusing on countering your opponent’s late game moves just to force him to run out of resources, then comfortably sit back as Fatigue does damage to them for you.
Mulligans & Class-Specific Tactics
Depending on what deck you’re facing your focus might shift. There are differences in strategy even amongst decks of the same type.
Exodia Mage
Exodia Mage is one of your worst matches. Control Warrior’s whole game plan is to take your opponent to late game, where he excells at. Unfortunately, two problems arise with this tactic against Exodia Mage: 1) It gives them the chance to draw into their combo. 2) Armor doesn’t matter against infinite Fireball. Your only chance here is to race them before they draw into their combo, which will be tough considering your deck is naturally slow.
Keep in mind that they can freeze your minions, but they can’t freeze you unless they’re lucky enough to discover a Freezing Potion. Therefor, he can’t prevent you from attacking face with your weapons aka. Fiery War Axe, Blood Razor, Shadowmourne. Try to drop their health as close to 1 as possible before breaking their Ice Block, so that one hit can do the job afterwards. Also, don’t look for value in Gromash Hellscream, 4 damage is enough in these situations.
Mulligan:
Fiery War Axe, Mountainfire Armor, Acolyte of Pain, Shield Block
Jade Druid
Jade Druid is another bad match, but you’ve got a lot more chances to win it. See, the problem with Jade Druid is that they’re better than you at what you excell in: Late Game. The more you prolong the match, the more time they have to buff their Golems. But there is an unexpected ally on your side: Skulking Geist. If you encounter a lot of Jades on Ladder, you should swap an Acolyte of Pain with this guy, effectively getting rid of all Jade Idol in their decks and leaving them with these Jade Sources: 2x Jade Blossom, 2x Jade Spirit, 2x Jade Behemoth and Aya Blackpaw. Make sure you save your removals for these cards, this Druid doesn’t have anything other than their Golems to fight you with. If you deal with these cards, Jade Druid is essentially beaten. Keep one Execute for their The Lich King to be sure.
Mulligan
Skulking Geist , Ravaging Ghoul , Shield Block ,
Shield Smash, Execute
Control Warlock
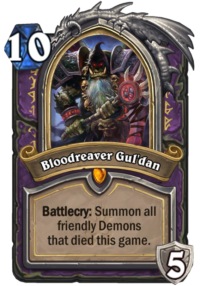
You basically follow your regular game plan, but keep two important plays in mind. You need an Execute on standby in case Warlock throws a Mountain Giant on turn 4. And you need a Brawl after turn 10 for when he plays Bloodreaver Gul'dan and summons back all his demons. Also, always keep another Execute or a Shield Smash with at least 8 armor for the second Mountain Giant.
Mulligan:
Execute, Ravaging Ghoul , Sleep with the Fishes, Fiery War Axe, Acolyte of Pain
Razakus & Big Priest
Both types of Priest decks play the long game and you’re better than them at it. Big Priest might pull a Barnes + Y'Shaarj, Rage Unbound combo so keep a Blood Razor or a Ravaging Goul and Fiery War Axe for the early game. Also look for a couple Execute in case Eternal Servitude brings back a problematic minion. You should try to duplicate Execute and other efficient removal through Dead Man's Hand, to make sure even in the late game you have cheap removal for the Priest’s big minions.
Execute , Ravaging Ghoul , Fiery War Axe , Shield Block , Mountainfire Armor
Murloc Paladin, Token Druid, Midrange Hunter & Evolve Shaman
All 4 decks rely on early swarm tactics, with the exception of Shaman who can keep it up even in the late game. Your priority is to collect your AoE, aka: Ravaging Ghoul, Brawl, Blood Razor and Sleep with the Fishes. Shield Block is your second priority to increase survivability and draw into your other AoE. These decks, with the exception of Shaman, run out of steam pretty quickly. You just need to break their early board control without sustaining too much damage and let them run out of resources.
Shield Block, Ravaging Ghoul, Blood Razor (against Shaman and Paladin, also keep Acidic Swamp Ooze for Weapon removal.
Pirate Warrior
Unfortunately, this is an aggro deck you can’t compete with by using AoE alone. To beat Pirate Warrior you need cheap removal like Shield Smash and a lot of Armor with Shield Block. You need an Acidic Swamp Ooze for their Arcanite Reaper or a buffed Fiery War Axe and small minions to trade with like Ravaging Ghoul and Mountainfire Armor. Play as defensive as possible while also dealing with their board without sustaining damage.
Mulligan:
Shield Smash, Shield Block, Ravaging Ghoul, Execute (to a lesser extend), Acidic Swamp Ooze
Combos
– You should look to duplicate N'Zoth, The Corruptor and Grommash Hellscream as well as key cards for that individual match, like Brawl against decks that rely on Swarm tactics and Execute against Control Decks. Rotface is another suitable target. The
Un'Goro Pack is also a good target sometimes.
– Try to have a Blood Razor ready before you drop Rotface. Or use Scourgelord Garrosh Hero Power to activate its legendary-summoning ability. Being an 8-cost minion means it’s usually difficult to play something with it the same turn. Same goes for Grommash Hellscream.
– If you know a turn is coming where you’ll need to play your Brawl, like a Bloodreaver Gul'dan turn or an Evolve turn, try to play Cairne Bloodhoof beforehand. More often than not Brawl will leave you defenseless so it’s good to have Baine Bloodhoof spawned on your side.
– Don’t use Scourgelord Garrosh recklessly. Your Armor Up Hero Power is very important. You only want to abandon said Hero Power if you’re in dire need of Shadowmourne or if you want to activate Grommash Hellscream‘s or to a lesser extend Rotface‘s abilities.
– Keep in mind that when Direhorn Hatchling dies, their Direhorn Matriarch is shuffled in your deck. That’s not neccesarely good, since it makes it more difficult to draw into more important cards in the late game.
– Only drop Armorsmith when she can provide immediate value. Use her in conjunction with other effects, like Acolyte of Pain or during a small AoE like Ravaging Ghoul.
– Against Paladin, keep your Acidic Swamp Ooze for Tirion or DK Uther. Against Shaman, keep it for Jade Claws. Against Pirate Warrior, use it for Arcanite Reaper or a buffed Fiery War Axe. Use it against a fully charged knife against Rogue.
– During the late game, you can use Shield Slam to activate Rotface and
Grommash Hellscream. If you have a Blood Razor already set up, use
Shield Slam to activate Rotface a second time and get more value from him.
– Don’t be afraid to drop Firemountain Armor or Rotface against Priest. Since they are 4 attack minions, Power Word: Pain and Power Word: Death won’t work on them.
– If you have Sleep with the Fishes in your hand, try to save a weak AoE to drop it with. Like
Ravaging Ghoul and Blood Razor. A 5-6 mana 4-damage AoE.
– If you notice you’re facing a lot of Jade Druids, replace an Acolyte with Skulking Geist. Don’t forget, this card only removes 1-cost spells. It won’t remove Patches the Pirate or Mana Wyrm.
I think in this meta have so much geist, shield slam should be replace with cards like slam or battle rage to draw more.
Repalce for rotface?
There’s not really a good replacement. The value you get out of a single activation of his effect is amazing. Not to mention you might just get another Deathrattle minion for N’Zoth.
Put in a big minion like Hogger, Doom of Edwyn. But it’s definately not the same. I suggest you try to collect dust and craft him.