
Our Shudderwock Shaman deck guide for The Boomsday Project expansion features one of the top lists for this archetype. This Shudderwock Shaman guide includes Mulligan Strategy, Gameplay Tips, Card Substitutions, and Combos/Synergies!
Introduction to Battlecry Shudderwock Combo Shaman
Shudderwock Shaman is the new Combo deck from the Witchwood. It got very popular early in the expansion, but it has fallen out of the meta just as quickly. After a few days, it was a rare sight on the ladder. However, the recent nerf patch has brought the deck back. Since the meta has slowed down by a lot, combo decks have enough time to gather all the pieces and
You can kind of call Shudderwock Shaman the new Exodia Mage. It has a better early/mid game and combo is not its only win condition, and the combo itself is a bit worse, but the premise is similar. The deck puts you on the clock from the get-go. You need to kill your opponent before he gathers all of the combo pieces, which might not be that easy.
The deck is also pretty difficult to play, and works best against specific decks. Which means that pro players are having a lot of success with this deck in high Legend, while it’s only a fringe deck (at least in terms of win rate, because it’s one of the most POPULAR decks) in lower ranks.
Boomsday Project Shudderwock Shaman Deck List
This is a potential Boomsday version of the deck. It has yet to be fully refined, but if you are looking to try Shudderwock Shaman in the new expansion this might be the way to go! We will be refining our lists and guides as soon as we can!


Check out alternative versions of this deck on our Shudderwock Shaman archetype page!
Shudderwock Combo Shaman Mulligan Guide and Strategy
VS Fast Decks
Higher Priority (Keep every time)
- Prince Keleseth – If a deck runs Keleseth, it’s always the highest priority card.
- Acolyte of Pain – 1/3 stats can actually clear a minion or two against Aggro, and draw some cards at the same time.
- Mana Tide Totem – Cycling is important, you want to get your combo pieces and/or defensive cards as quickly as you can.
- Saronite Chain Gang – It’s 2 in 1 against Aggro – solid defensive card and
Lower Priority (Keep only if certain conditions are met)
- Lightning Bolt – If you play against a deck which can drop an early minion you absolutely have to answer – such as Odd Rogue with Vicious Fledgling.
- Gluttonous Ooze – Against decks with weapons.
- Lightning Storm – Against Paladin, or boar flood decks in general. You need that AoE clear against Odd Paladin and you need it quickly.
- Mind Control Tech – Vs Paladin. He will flood the board very quickly and stealing the right card can win you the game. Even in the worst case scenario, you get a 3/3 + 1/1 that cleared a 1/1 for just 3 mana.
- Volcano – Just like Storm, keep against board flood decks.
VS Slow Decks
Higher Priority (Keep every time)
- Prince Keleseth – Always keep, there is no situation in which you want to throw Keleseth away.
- Mana Tide Totem, Acolyte of Pain and Far Sight – Card draw is most important in slow matchups, the more cards you draw, the faster you get your combo.
Lower Priority (Keep only if certain conditions are met)
- Gluttonous Ooze – Against decks with weapons.
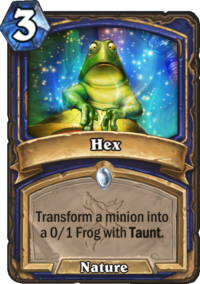
- Hex – In certain matchups, like Cube or Even Warlock. Them dropping a big minion early that you can’t answer is often game over for you.
Shudderwock Combo Shaman General Playstyle and Strategy
Vs Aggro
Playing against Aggro decks is definitely more difficult. They don’t give you enough free time to draw cards, gather your combo pieces and then finally play your Shudderwock. They will push you every single turn, which makes faster matchups particularly difficult. While your combo usually locks them out of the game, you will rarely get a full combo before Turn 10, meaning that it’s often too late and the game is already lost. Which means that most of the Aggro games are played and won without the combo – it’s just a nice back-up plan in case the game gets long enough and you have no way to seal it.
Ideal scenario vs Aggro is getting Prince Keleseth. It will make your on-board trades much better. However, since you get him in your opening hand roughly in 1 out of 4 games, that’s not something you can build your game plan upon. Which means that you will need to improvise.
Surviving is most important, but how do you do that? First, by playing as many minions as you can. They will either soak the damage or even clear some of the opponent’s minions. Even if your opponent has a good trade on the board into one of your minions, it might still be worth to drop it. For example, dropping Saronite Chain Gang into 2x 3/4 might not seem like the best idea. But not only it soaks 6 damage, but it also sets up a much better Lightning Storm. Or maybe you will draw a second Saronite Chain Gang and now those minions will die when trading.
Even though you have quite a lot of AoEs, you need to save them for the right scenarios. Because trust me, if you’re holding two AoE cards in your hand, an Aggro deck will be able to breeze through them and still flood the board. Try to not use AoEs until you have to – e.g. clearing 4 damage with Lightning Storm is often not the best way to use it, you’d rather play a minion or something instead, or just Hero Power and bait more power onto the board.
Hex can be used to deal with a bigger minion they might drop. But if you know that your opponent does not play big minions, or at least it’s not likely that they will drop one in the next few turns, it might be a good idea to use it to clear a smaller minion, such as a 3/3. If you have no other way to deal with it, that 3/3 is going to deal LOTS of damage by staying on the board and attacking every single turn.
Glacial Shard can be used to either stall a big minion (e.g. if you freeze 8 Attack minion, which would go for your face, it’s basically like healing for 8 for just 1 mana), or stall a smaller one to set up for a better AoE.
Healing Rain comes handy after you’ve already stabilized. You generally DON’T want to play it before AoE clears or minions, unless you will die if you don’t. Healing when your opponent still has minions on the board is often pointless – it will just buy you a single turn and that’s it. If you can choose between healing and clearing the board, you should clear the board first most of the time.
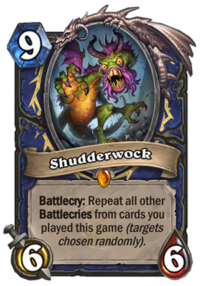
And finally, Shudderwock himself. The most important question is – when do you play him? And I’d say that the best answer would be “as soon as you can”. Of course, it depends on the exact situation, board state and such, but you usually don’t even need a full combo to win. For example, if you’ve played 2x Chain Gang and a Lifedrinker already, but no Grumble, it’s still a good play. You get 3x 6/6 minion, deal some initial damage, heal yourself, and get all other Battlecries (such as Gluttonous Ooze, which might be handy if your opponent is holding another weapon). Fast decks won’t have a way to clear such a board anyway, so you should be able to close it next turn anyway.
If you play against an Aggro deck which has a lot of staying power and MIGHT clear your board of Shudderwocks, then you might want to wait for a full combo. It really depends on whether you can afford to. If you still have resources, and you can fight your opponent off for another few turns, there’s no harm in waiting for it.
Vs Control
Control matchups are easier, and unlike Aggro, where you MIGHT win some games by simply surviving, against Control you have pretty much a single win condition – Shudderwock combo. Which means that you need to set it up and play it as quickly as possible.
Before talking about the combo, however, I will talk quickly about one scenario in which Shudderwock might not be your only way to win. Getting a Turn 2 Prince Keleseth, especially if it’s followed by Zola the Gorgon and replayed again on T4, means that the minions in your deck are really strong – they might be more than your opponent can handle. For example, Saronite Chain Gang is 2x 4/5 Taunt for 4 mana. Glacial Shard is a 1 mana 4/3 that freezes. Mana Tide Totem is a 3 mana 2/5 that draws a card every turn. As you can see, those are incredibly powerful and might actually be enough to win the game. And they’re definitely enough to keep your opponent busy so they won’t finish the game quickly.
However, since that doesn’t happen often, we will focus on your regular win condition, which is the Shudderwock combo. What is this combo anyway? Let me explain it. Since Shudderwock replays every Battlecry you’ve played this game, the combo is built around dealing damage with Battlecries, then bouncing the Shudderwock back the to hand. Saronite Chain Gang‘s Battlecry creates a copy of Shudderwock, and then Grumble, Worldshaker‘s Battlecry bounces those copies back. It basically means that after your initial set-up turn you get a bunch of 1 mana Shudderowcks in your hand and you can play them to slowly but surely kill your opponent. Even with just a single Lifedrinker trigger per Shudderwock, opponent will eventually just die.
However, there is a catch. Since Shudderwock’s Battlecry has a random order, the combo is NOT guaranteed. If your Grumble triggers before Saronite Chain Gang, you won’t bounce the Shudderwock. Remember that minions can’t target themselves / aren’t affected by their own Battlecries (unless the Battlecry specifically states so). To prevent that, the deck runs Zola the Gorgon, which is an alternative way to get another copy of Shudderwock in your hand… but if both Grumble and Zola trigger BEFORE Shudderwock, the combo fails. There is a way to make it consistent, by running Murmuring Elemental, but the general consensus is that it’s just not worth it, mostly because you have to drop Prince Keleseth, but also because Murmuring isn’t that useful outside of the combo. Given that the combo failing completely is a rare occurrence, best builds generally don’t run it.
Then, you need to remember that your first Shudderwock turn is NOT killing your opponent yet, unless he’s really low. It’s the second turn when you can drop him multiple times – that’s the real combo turn. It’s important to remember, because if e.g. you’re staring at a big board that will kill you (even through the healing from Lifedrinker), you might want to e.g. drop Volcano first to deal with it + heal yourself with Healing Rain and postpone the combo. Yes, it’s not optimal, but it’s better than just dying.
The idea behind Hemet, Jungle Hunter in this list is to make you draw your combo pieces much faster. Since every single card you need to play before Shudderwock costs 4 or more mana, Hemet destroys all of the lowest cost cards, making you draw the combo pieces and/or Shudderwock much faster. It’s not necessary, as you usually have enough cycle to get to your combo quite quickly anyway, but it helps if some combo pieces get stuck at the bottom of your deck. It’s easier to get through e.g. 6-7 cards than through 15 cards left in your deck if Shudderwock is the final card. Drop him as soon as you can.
One important thing to remember when playing vs Control is that Hex is your only hard single target removal, and lots of Control decks are playing multiple good targets. You generally want to Hex the most aggressive minions. For example, against Cube Warlock, you want to Hex (if you can’t deal with them otherwise) Mountain Giant and/or Doomguard. Normally, Hexing Voidlord might be better, since it’s harder to clear, but it’s best to save it for the more aggressive plays. Hex also works incredibly well against decks that build their plan around reviving some minions. In the current meta, that deck is Taunt Druid. By Hexing a big Taunt minion you not only remove it from the pool of cards revived by Hadronox, but you also make Witching Hour less consistent. After two Hexes, Druid will only have a 1/3 chance to revive Hadronox.
When it comes to other general tips, I’d say that unless you want to drop him as a 6 mana 7/7, you can really wait with Grumble until you can bounce something back. Good targets include Keleseth, Chain Gang, Lifedrinker, and Zola the Gorgon – you can replay them for just 1 mana and get their Battlecry again. Gluttonous Ooze is also good bounce target if you face a deck running weapons, or MCT if you face a board flood deck. You can also use it to “heal up” your minions after making trades, although your minions generally have low health, so it might not be very useful.
Shudderwock Combo Shaman Card Replacements
Shudderwock Shaman is a very expensive deck. It runs multiple Epic & Legendary cards. Some of them are absolutely necessary, but others can get replaced. Here is a list of the expensive card it runs with potential replacements:
- Prince Keleseth – Since he’s not a part of the combo, he can get replaced. However, it’s not as simple as just adding another card instead. If you don’t run Keleseth, you want to have more 2-drops, so you also need to get rid of some other cards, such as Far Sight, Gluttonous Ooze, Glacial Shard, Lightning Bolt etc. and put 2 mana cards instead. The best 2 mana card is definitely Doomsayer, although it’s Epic, so not every player will have it. Other than that, Acidic Swamp Ooze, Loot Hoarder or Bloodmage Thalnos are other good options.
- Zola the Gorgon – She’s the combo back-up plan, so she’s pretty necessary. You can still play the deck without her, but it will make your combo less consistent. If you play a non-Keleseth build, you can use Murmuring Elemental to make the combo more consistent instead. However, if you run a Keleseth build, you want a generic replacement, such as Earth Shock, Tar Creeper, Sandbinder or Primordial Drake.
- Grumble, Worldshaker – Part of the combo, impossible to replace.
- Hemet, Jungle Hunter – Not necessary, can be replaced. Use any of the generic replacements listed above.
- Hagatha the Witch – AoE, Armor gain and a great value tool all in one. While she’s not the part of the combo, she’s hard to replace. If you don’t have her, use any of the generic replacements above, but probably Primordial Drake would be best.
- Shudderwock – Your most important combo piece, you can’t replace him.
- Far Sight – Cycling is important in this deck, but you can run another cycle card instead. Sandbinder or Gnomish Inventor would be the best replacements.
- Gluttonous Ooze – Normally you’d be able to replace it with Acidic Swamp Ooze, but this build runs Keleseth, so it’s impossible. You can run Harrison Jones if you have him. Alternatively, Corrosive Sludge is an option, but a pretty weak one. You can also drop the weapon removal whatsoever and run one of the generic replacements.
Leave a Reply
You must be logged in to post a comment.
I don;t see Hemet in this deck…. I gave it and I want to put it in deck but dont know what should i remove for him :D.
U can replace storm chaser with hemet