Today I’d like to discuss how to optimize your trades, play on curve, and finally, I would like to expand on the term board control that I briefly touched on in the last guide. In this series of guides, I focus on simple tricks that players new and old alike can utilize to increase their success in Hearthstone. In my last guide, I discussed how to use tools such as bluffing and card advantage to gain the upper hand and increase your odds of victory.
Board Control
Before we begin, we must first know what board control is. Board control can be defined as an assessment of the power level of each player’s board state. You then compare the two board states and whichever player’s board is ‘strongest’ is the player who has board control. Now having the strongest board can mean a lot of different things depending on the situation. For example, a board that is considered to be strong against a Druid might not be considered strong against another class, such as Mage. This is because Druid lacks significant AoE while Mage is a class that has an abundance of AoE. For this reason, you must always consider whether or not you truly have board control by considering how much removal your opponent has access to and how effective it will be relative to your current board state.
Let’s analyze each class’s strengths and weaknesses regarding board control:
Mage
- Strengths: Abundance of Area of Effect board clears (Meteor, Flamestrike, Blizzard, Volcanic Potion, Dragon's Fury). Good single target removals (Frostbolt, Fireball, Polymorph).
- Weakness: Medium to high mana cost for AoE board clears. Many single target removals also count as a burn and are their win condition.
Rogue
- Strengths: Extremely cheap and mana efficient single target removal spells and minions (Backstab, Eviscerate, SI:7 Agent, Sap, Vilespine Slayer etc.)
- Weakness: No efficient AoE Board clear. Most of the decks can only Vanish to stall, but be careful about Blade Flurry if you face a Kingsbane deck.
Warrior
- Strengths: Cheap single target and AoE removal (Brawl, Execute, Sleep with the Fishes, Shield Slam, Reckless Flurry), can use weapons for efficient board control.
- Weakness: Much of the removal is situational or RNG dependent (minion must be damaged, Brawl RNG, etc), takes damage when using weapons as a removal.
Shaman
- Strengths: Cheap and efficient AoE and single target removals that also synergize with their hero power spell damage totem (Maelstrom Portal, Jade Lightning, Lightning Storm, Volcano, Hex, Devolve)
- Weakness: Some of their removal comes with an Overload penalty. Light on single target removal for large minions (Hex, possibly Crushing Hand).
Warlock
- Strengths: Quite a few options for small, medium and big AoE (Abyssal Enforcer, Defile, Hellfire, Twisting Nether, Shadowflame etc.)
- Weakness: Expensive or conditional single target removal (Lesser Amethyst Spellstone, Siphon Soul, Blastcrystal Potion) and most of the AoE comes at a hefty cost of sacrificing health or minions.
Druid
- Strengths: Able to cheat mana costs. Can stall the big boards with Spreading Plague. Quite efficient small, single target removal (Wrath, Lesser Jasper Spellstone).
- Weakness: Very little actual AoE (Swipe). Severely lacking in big single target removal (Naturalize is the only one, but comes with a significant downside).
Hunter
- Strengths: Decent Single target removal options (Hunter's Mark, Deadly Shot, Kill Command, Flanking Strike). Can stall a big minion with Freezing Trap. Can somewhat counter a big board with Unleash the Hounds.
- Weakness: No efficient AoE (Explosive Trap and Deathstalker Rexxar are the only real options, but the first one can be played around and second one is rare and expensive). Most of the single target removal options are conditional or can often be played around.
Paladin
- Strengths: Can buff or heal minions to trade efficiently. Has access to one of the cheapest board wipes in the entire game (Consecration]. Can use weapons to clear minions (Rallying Blade, Truesilver Champion). Sunkeeper Tarim can be used to swing the board state against big minions.
- Weakness: AoE board clear rely on the Equality combos, so are less consistent than single target spells, and clear Paladin’s minions too. Outside of the weapons, no efficient single target removals.
Priest
- Strengths: Can heal up minions with Hero Power and spells after establishing board control. Has some of the strongest single target AND AoE removals in the game (Shadow Word: Pain, Shadow Word: Death, Potion of Madness, Dragonfire Potion, Auchenai Soulpriest + Circle of Healing, Psychic Scream)
- Weakness: Vulnerable to Dragons (against Dragonfire Potion and four attack minions with high health.
Now that we’ve assessed each class’ strong and weak points, it’s much easier to see how to obtain and maintain board control against each class. For example, if you are fighting a Druid, having multiple high health minions on the board will be extremely difficult for the Druid to deal with and will likely overwhelm them (they can only stall with Spreading Plague, but you should be able to clear it efficiently with high health minions while establishing more board). Against a Rogue, it is more valuable to go wide on the board as opposed to investing most of your mana into one strong minion. And against Mage, you can go wide on the board early, before they can access their expensive AoEs, but you need to play around them past Turn 5.
Now that we’ve analyzed what board control is and how it can be defined against different classes, let’s take a look at the next step and talk about how to obtain and keep board control.
Optimizing Trades
Optimizing trades is the practice of doing what is called ‘Value Trading’ which is to get the most out of your minions when making trades. A large part of value trading is realizing when it is appropriate for you to trade into your opponent’s minions and when it’s better to allow the opponent to dictate the trades.
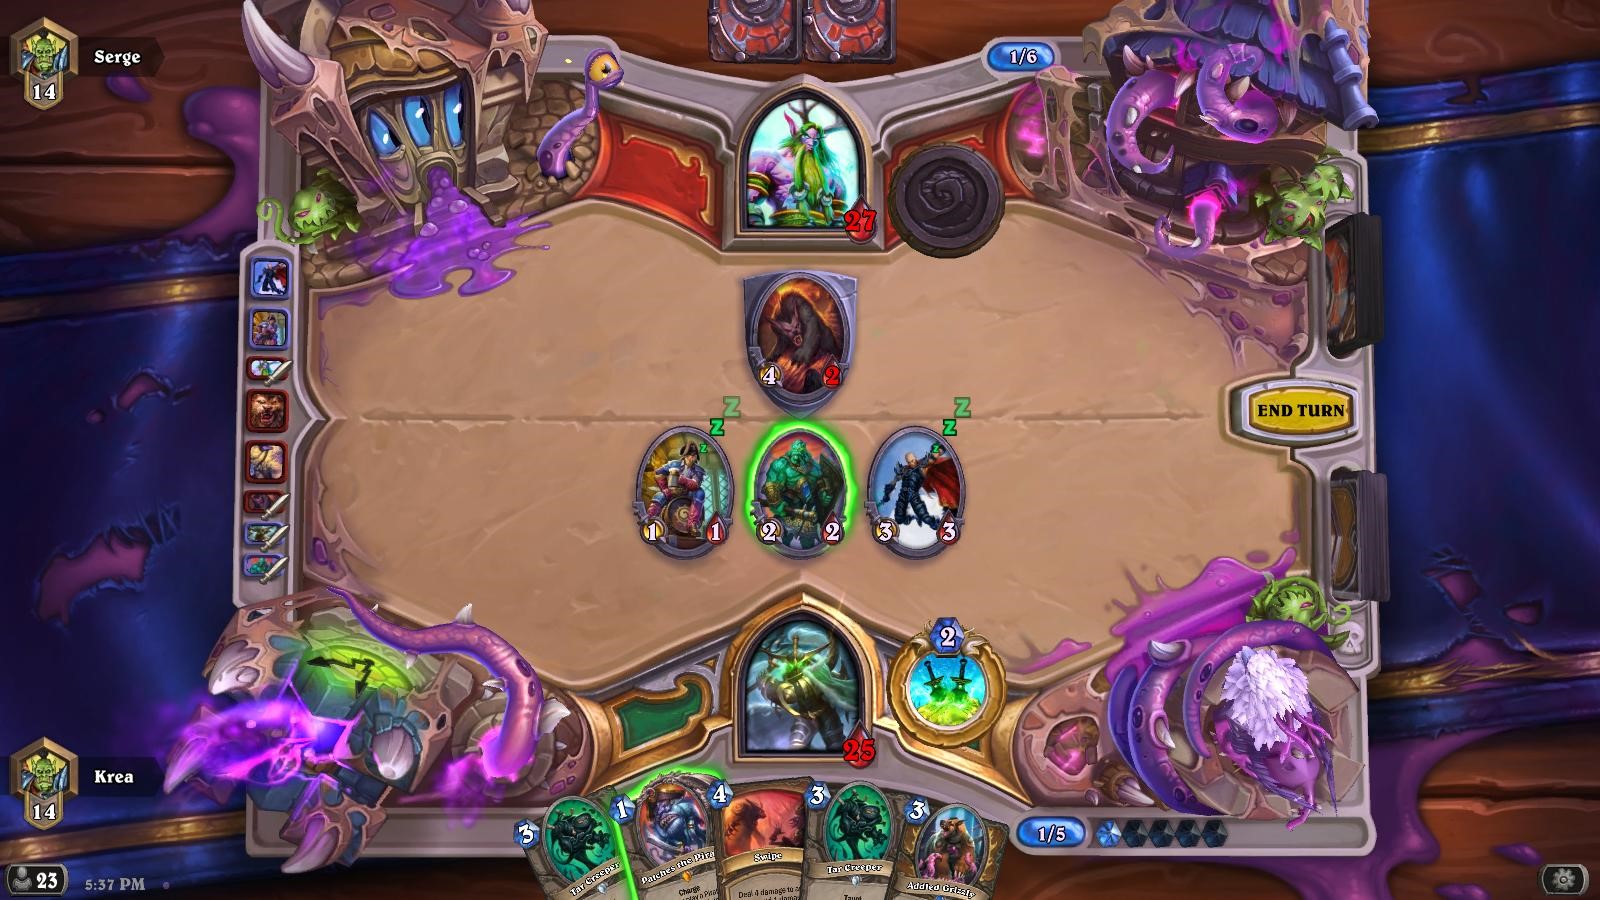
In this example, we can see that I’ve just played Swashburglar which then summoned Patches the Pirate from my deck. What is the correct play here? Do I attack face with Patches, or do I trade my Patches into my enemy’s Swashburglar?
In this specific context, it is almost always correct to go face with your newly summoned Patches and to never trade.
Why is that though? This is because it can almost always be assured that the enemy Rogue will either Dagger up and trade into my minions to clear the board because I have board control, or they will play a 2-drop (e.g. Prince Keleseth) and trade their Swashburglar into one of my Pirates. Regardless of their decision, it almost always results in them trading into my minions to reset the board state and prevent me from maintaining board control.
As we can see, I made the right decision and my enemy does decide to trade into my minions. By going face instead of trading, I was able to squeeze in an extra point of damage to my opponent’s health, and every point of damage counts!
In this next example, my opponent has two 1/1 tokens on the board. Should I trade into them?
The answer is no. My opponent is a Hunter and can definitely utilize tokens by buffing them up. However, these specific tokens are not Beasts. If they were beasts, I would have definitely traded my minions into his since Turn 4 generally leads into Houndmaster. But these tokens have no tag so it’s better to push more damage into the Hunter’s health pool and let my opponent make the trade into my tokens.
If the enemy does not trade into my tokens, it allows for me to utilize them later to do what is known as ‘Trade Up.’ Trading up is when you use a much weaker minion to attack an opponent’s stronger minion to kill it.
The opposite of trading up is to trade down. In this context, using my 3/3 Shaky Zipgunner to kill one of my opponent’s 1/1 tokens would be considered trading down, or using a stronger minion to kill a vastly weaker minion. Trading up is almost always good except for certain situations where it is better to not trade at all because you are close to lethal. Trading down is very situational and you only want to trade down when you have a good read on the enemy that they will utilize one of their weaker minions on the following turn in such a way that will harm you late game, thus making it more beneficial to kill it now. A great example of when to trade down is when you want to clear any tokens that a Hunter might have with the Beast tag.
Playing On Curve
The final lesson for this guide is playing on curve. To play on curve means to utilize all of your mana in any given turn. For example, Turn 1 playing N'Zoth's First Mate, Turn 2 playing Bloodsail Raider, Turn 3 playing Bloodsail Cultist, etc.
When you use all of your mana each turn, you are playing on curve. Depending on the archetype of deck you are playing, it can be very beneficial to play on curve. An example of a deck that likes to play on curve, also known as to ‘curve out’ are Aggro/Midrange decks, such as Murloc Paladin. Vilefin Inquisitor on Turn 1, followed by Rockpool Hunter on Turn 2, Murloc Warleader on Turn 3, Gentle Megasaur on Turn 4, etc.
Midrange decks are built in such a way that when you are able to curve out you build a large amount of momentum and can oftentimes just overwhelm your opponent.
Some Aggro and Tempo decks also like to curve out, decks such as Pirate Warrior and Token Druid. When these decks get ‘the perfect curve’ it can feel oppressive and unfair.
Some decks, however, do not wish to play minions on curve, but do wish to still wish to utilize all mana given to them in the mid game, and sometimes not even spend mana at all late game. These terms are known as ‘filling your curve’ and ‘floating mana.’ Filling your curve is when you have a little bit of mana left over, so you play a cheap card or use your hero power to use the remainder of your mana. Floating mana is when you don’t utilize all of the mana given to you in a turn.
Here is a good example of floating mana. On this specific turn, I choose to not play Patches the Pirate from my hand. I have one extra mana, why not play Patches? The reason for holding back is because if I were to play Patches the Pirate, it will likely die to an enemy Swipe on my SI:7 Agent, which would clear my board. Instead, by saving Patches, I can buff it with the help of Addled Grizzly that my Swashburglar obtained. This allows me to get more value out of my mana in a future turn by floating mana on my current turn.
Some decks will naturally float mana due to the nature of the archetype. Some examples of this are primarily Combo decks, such as Miracle Rogue or Exodia Mage. Most of the game is spent passing turns and conserving resources until you are able to unleash your combo and win, which means you will occasionally float mana.

This next image is a great example of a combo deck at work. In this particular scenario, it’s my turn and I have three mana to spend. What is the most optimal play? Should I play the Swashburglar and Jade Shuriken to establish Board Control? Should I hit his face and use my Hero Power?
In order to come to the correct answer, we must think of all of the possible outcomes and most importantly, consider the nature of our deck.
In this match, I was playing an Elemental Rogue with Jade synergies, due to the patch giving Jade Spirit an Elemental tag. I see that my opponent has passed for three turns in a row, so I know that all of the cards in his hand are reactive removal tools. On top of this, I know that I can overwhelm my opponent late game with large Jades and elemental synergies. If I play Swashburglar, it is very likely that one of the reactionary tools in his hand is Potion of Madness, which will reset the board. However, if I save Swashburglar, I can use it later as a one damage ping from summoning Patches from my deck. For this reason, I chose to use Fan of Knives. I found that my hand was lackluster and it was better in this particular situation to use my turn to cycle through my deck while the board was clear and while I’m not under any pressure. This play allows me to advance my game plan of getting deeper into my deck while also utilizing all of my mana for the given turn.
On the other hand, one thing to consider is that the longer you wait before you play a Pirate, the higher the chance to draw Patches instead it. However, in this case, with over 20 cards still left in my deck, I’ve decided to take my chances of having a better next turn instead of having a mediocre Turn 3.
Hopefully, you all can now see how such simple mechanics can have a very large impact on the outcome of your games, and can utilize this information to become better Hearthstone players.
Thanks for reading and good luck on the ladder!
Guide by Krea
RIP Old Patches. We will never forget you.
Should have had battlecry charge for when you draw him 🙁
this is a good idea