
Our Token Druid deck list guide goes through the ins-and-outs of this returning Druid build from Darkmoon Races! This guide will teach you how to mulligan, pilot, and substitute cards for this archetype!
Introduction to Token Druid
Token Druid is one of the old-school Hearthstone archetypes, a deck that has been going in and out of the meta basically ever since the game released. Over the last two years, Blizzard has tried to push it in a more Treant-oriented way, with multiple new cards that summon them and other that benefit from having them on the board. And while early Token Druid builds after Darkmoon Races launched were also based on Treants, they’ve quickly shifted towards a more aggressive style.
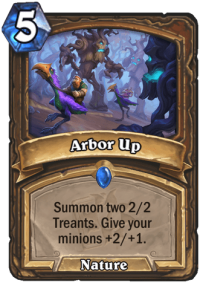
But no matter which build you prefer, they were both made possible by one new card – Arbor Up. At the very least, the card summons two 4/3 minions for 5 mana – which is not great, but not the worst card ever. However, it’s also an AoE buff for the rest of your board, meaning that any extra minions that you already have (and given what deck you play, you should have a bunch of them) benefit from it heavily and make the card stronger. You can – of course – also use it as a Savage Roar-esque finisher, and this flexibility of being able to build the board, make existing board stronger or close the game is what pushed Token Druid into high Tier.
Token Druid Deck List
Check out alternative versions of this deck on our Token Druid archetype page!
Token Druid Mulligan Strategy & Guide
Higher Priority (keep every time)
- Gibberling – The card is a base for most of your early game plays – summoning a bunch of them on T1/T2 is sometimes enough to win you the game right away, and even if not, it will certainly make it easier.
- Nature Studies – Gives you a T1 play and the discount means that you can either curve out with Fortunes on T2 or play another spell (earlier.
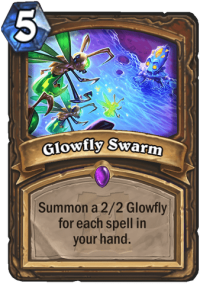
- Fungal Fortunes – Given that two Gibberlings are the only minions in your deck, most of the time you’re going to draw 3 cards for 3 mana. It’s a good way to build up bigger hand to be able to set up some plays like Glowfly Swarm.
Lower Priority (keep only if certain conditions are met)
- Innervate / Lightning Bloom / Adorable Infestation – Those cards might be a keep if you have Gibberling in your hand. Innervate / Bloom not only create an extra 1/1 for free, but also give you more mana to play more spells. Infestation is a good, cheap spell that combos well with Gibberling.
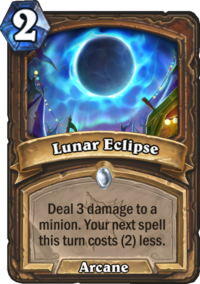
- Lunar Eclipse – Keep against board-based Aggro decks like Zoo Warlock. You usually want to play it on the same turn as another spell to take advantage of discount – e.g. play it on T2 with Dreamway Guardians – what you get then is virtually a 0 mana 3 damage removal.
Token Druid Strategy Guide
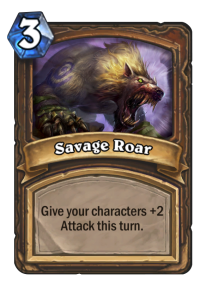
Your general game plan is the same no matter what deck you play against. Token Druid is incredibly board-based, you can’t do anything without minions on the board. Many cards are either useless or much weaker if you don’t have minions. That’s why your basic strategy is to flood the board constantly, then buff it and win the game either with pressure of with a finisher such as Savage Roar.

First let’s talk about Gibberling strategies. It’s your most powerful tool in the early game. What you want to do is not necessarily drop it right away, but wait until you can summon multiple copies and preferably buff them on the same turn. It might be Turn 1, but sometimes you have to wait until Turn 2 or 3. A good example of a solid Gibberling opener is Gibberling + Lightning Bloom + Nature Studies + Power of the Wild. You end up with 3x 2/2 + 1/1 with Spellburst. It might not seem like that much, but remember that it’s Turn 1 – your opponent isn’t likely going to be able to clear your board and you will be able to deal some damage vs slower decks and have some early board control vs Aggro.
Your second best way to flood the board is Glowfly Swarm. Given that nearly your entire deck is made of spells, you should usually summon at least 4-5 minions with the card (possibly even all 7 if you played Fungal Fortunes). Which makes it extremely powerful against decks with no AoE removal – unless they already have multiple minions to trade into your 2/2’s, you should start your turn with at least a couple of minions, which is nice.
However, no matter how you’re flooding your board, remember to not put all of your eggs into one basket, at least without some sort of insurance. For example, dropping Swarm into double Lightning Bloom into Arbor Up on Turn 6 creates a really big board, but at the same time you’re risking too much – if your board gets shut down, you’re most likely out of the game. It’s much better to take things slowly – just dropping Swarm is enough, maybe Swarm + Power of the Wild if you have enough mana and your opponent runs 2 damage AoE.
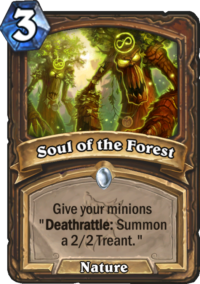
But talking about “insurance” – Soul of the Forest is one of your best cards against slower, removal-heavy deck. It makes your board stick very often, because your opponent has to kill your minions not once, but twice. Many decks don’t have a way to do it, which means that at least a few minions are going to stick. Another “insurance” might actually be simply more plays in your hand. For example, if you just drew a full hand of cards and have stuff to do for the next 2-3 turns, using some more resources without an immediate pay-off is not a bad deal. But usually you want to flood the board first and then use buffs etc. on the next turn.
A card that you need to pay a lot of attention to late game is Solar Eclipse. It’s nearly useless early in the game, but scales incredibly well. The best combo is probably Solar Eclipse + Arbor Up. Even without any other minions on the board, it summons 2x 6/4 + 2x 4/3, which is already a threatening board. If you already have 1-2 other minions, it becomes even better, as it gives everything +4/+2. Another good way to use it is as a big refill with Fungal Fortunes – you draw up to 6 cards that way. It’s a very slow play, but it sets up your future turns nicely by giving you more things to do. Of course, doubling Savage Roar as a finisher is also nice and costs only 5 mana. And finally, Nature Studies or Rising Winds might be okay cards to copy if you really have nothing else to do.
Vs Aggro
When it comes to tips specific to Aggro matchups, one of the most important differences is that they run little to no AoE removals. It means that they have to use their own minions, weapons and single target (often burn) spells to get rid of your board. Which means that unlike Control, you CAN go all-in against Aggro without worrying much. There are some exceptions (like a Highlander deck with Zephrys the Great, or some Discover cards) but most of the time going all in is a good idea.
Another reason why you want to go all-in is that you have no catch-up mechanics. Lunar Eclipse and sometimes BEEEES!!! (depending on the specific build you run) are your only removals, which means that once you fall behind, it will be very hard to get back into the game. That’s why either a Gibberling opener or a fast Glowfly Swarm (e.g. Innervating/Coining it out on T4) is the best way to win.
While most of the time your Health is not a concern (if anything, you will die because you lost the board not because your opponent is burning you down), Dreamway Guardians might come handy at times. If you think that you will need extra healing in a given matchup, you might try to wait until you can buff them immediately – even with a simple Power of the Wild. More attack means more healing and more health means that they are more likely to survive.
Vs Control
When playing such a board-oriented deck vs Control, one of the most important things to figure out is exactly what AoEs your opponent is running. How much mana they cost, how much damage they deal etc. Based on that, you can plan your flood turns much easier. For example, if you face a Priest who might run Breath of the Infinite, then just dropping “naked” Glowfly Swarm is not a good idea. On the other hand, if you play against a deck with no cheap AoE, you should try to flood the board before they have access to it. Or, another example is Bladestorm. You want to play around that by having different health totals across your minions. Swarm + Arbor Up is quite useless if it just dies to a single 3 mana removal spell. But, for example, playing Swarm for 5 minions and then using Adorable Infestation on one of them now means that Warrior has to clear the 1/1 first – which might force them to use extra resources or even not AoE at all because they have no way to do it.
Most of the time, you’re going to win Control matchups with a big burst from Savage Roar or Arbor Up. If you’re already holding those, try to set up lethal as often as you can. It might actually be quite easy with e.g. Solar Eclipse. With just three minions on the board, if you double Savage Roar, you’re adding 16 extra damage. Let’s say that those minions are 2/2’s, that’s 22 in total – often enough to just kill your opponent. If you have A LOT of burst in your hand, like triple Savage Roar (2x Roar + Solar Eclipse), you might actually hold back and summon only a couple of minions, like 2-3. For example, if you just drop Dreamway Guardians, there’s a high chance your opponent is going to ignore them, thinking that you can’t possibly kill him with just two 1/2’s and save his AoE for a bigger board. And then you drop lethal out of nowhere. Of course, those are more rare scenarios, but it’s something to consider.
Token Druid Card Substitutions
One of the upsides of Token Druid is how cheap the deck is. It requires exactly zero Legendaries and the only Epic card in the deck is Glowfly Swarm which – sadly – you can’t replace. It’s your main mid-late game board flood tool and playing without it would impact your win rate significantly.
There are, however, some tech choices you might consider. Treenforcements and BEEEES!!! are good in faster matchups, while Guess the Weight and Blessing of the Ancients would make the deck slightly better against slower builds. If you want to try some of those, your flex slots include Innervate, Lunar Eclipse and Soul of the Forest (which you want to get rid of only if you mostly face Aggro).
You can also try a Treant-focused build, such as the original Feno’s version, but I wouldn’t recommend it – faster Gibberling versions are both stronger and cheaper.
Leave a Reply
You must be logged in to post a comment.
This is so helpful, especially to someone who just bombed a few times trying to get the hang of it. This should speed up my learning curve. Thank you!
Im not paying for content, so what can i swap in for rising winds?
Treenforcements, Guess the Weight or BEEEES. Guess the Weight is the best if you face more slow decks, BEEES if you face aggressive ones, and Treenforcements is somewhere in between.
Rising Winds is good because of flexibility between card draw and board presence, but it’s not a key card 🙂
????
Ignore that, was meant to be a thumbs up.
I only play one deck per meta, so I love getting the deck guide for my deck of choice 😀